Introduction
A common question that comes up when setting up a web application to use the state server is “what happens if the state server fails?” and the answer is that the web application fails.
This article proposes a failover solution, such that if one state server goes down, the web application switches to another one.
In addition, the solution performs state server load balancing by
distributing requests across available state servers.
Overview
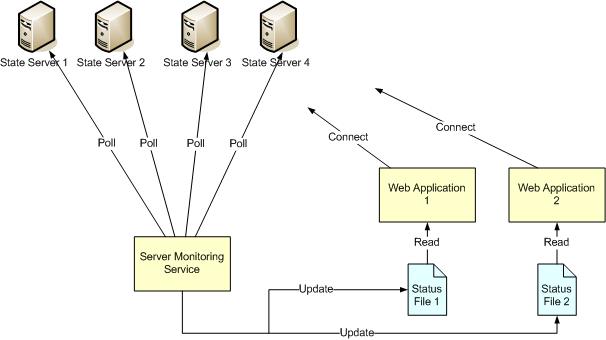
The proposed failover system monitors a specified list of state servers to determine which ones are running; the web application can then decide
on which one to use.
The process of monitoring a state server is expensive, so it is handled by a dedicated external service. This service notifies the web application (and other web applications) when state servers come online
or go offline. The process is illustrated below.
How it works
The failover system comprises two parts.
The first part is the monitoring service, which polls the status of a given list of servers by simply
connecting and disconnecting to the servers continuously. If there are any changes in the availability of
servers, for instance, a server that was previously unavailable becomes
available or vice versa; one or more status files are updated to reflect the change.
A status file contains information about the state servers in use and their
online status. ASP.NET
applications can detect changes to these status files and react accordingly.
The monitoring service has a configurable time period, within which a monitored
server that comes online must stay online before the service will update the status
files with the change in status for that server. This helps reduce connections to
servers that are successively coming online and going offline -- the so called flapping
server phenomenon. The length of this time period is determined by the
ServerWarmUpTime configuration setting.
It's important to note that the monitoring service can detect the availability
of other types of servers, not just ASP.NET state servers, and so can be used
for other purposes.
The second part consists of configuration settings and code in the web application that expands
upon
Maarten Balliauw's most excellent series
on state server partitioning and load balancing. The web application is
configured such that the configuration file is extended to the external status
file. Changes made to the status file cause the application configuration
settings to be re-read and updated with the new values. Thus, the web application always has the latest
server availability information and uses the information to distribute requests to available state servers -- achieving both load balancing and failover support.
For example, if there are five state servers in use and they are all running, the
status file will indicate that the five servers are available; the web
application then distributes state server requests evenly across the five
servers. If two of the state servers were to suddenly go down, the status file
will be updated to indicate that only three state servers are available; the web application then redistributes
state server
requests to only those three. The overall effect is that during a state server
downtime, users will be able to continue using the application. Some sessions will be lost, but that is a slight annoyance compared to
the entire application going down for a long period of time.
To use this load-balanced, failover-supported setup, the web application needs a
few configuration changes and two code files in the App_Code folder; namely ServerListSectionHandler.cs and PartitionResolver.cs.
ServerListSectionHandler.cs enables the status file to be read
as part of the application configuration. PartitionResolver.cs
contains a custom state server partition
resolver class that decides which state server to connect to. This class also tries to pin users to particular state servers so
that changes in the status file only affects users whose session was stored on
the failing server.
Using the code
To set up the server monitoring service
- Download the source files.
- Open up the ServerMonitor solution in visual studio.
The solution contains two projects. One runs the service as a console application
and the other one runs it as a windows service. The ServerMonitorService
project compiles as a windows service and can be installed and uninstalled
with the included install_service.bat and uninstall_service.bat
files. The ConsoleServerMonitor project runs the service as a console
application, which is a lot easier to test and debug. Both projects share
the same sources and function identically.
- Open up the project's application configuration file.
- In the Servers section, specify the state servers you want to use, like as shown below:
<Servers>
    <!-- List of servers to poll -->
    <add key="Server1"  value="localhost:42424" />
    <add key="Server2"  value="appserver1:42424" />
    <add key="Server3"  value="72.27.255.9:42424" />
</Servers>
- In the StatusFilePaths section, add the full file pathname of the status file.
This file should be located in the folder containing your web application or in subfolders.
You can add multiple paths, if you want to notify multiple web applications, as shown below:
<StatusFilePaths>
    <!-- List of file paths where status files are saved/updated -->
    <add key="Web1" value="C:\Inetpub\wwwroot\MyWeb1\server_status.config.xml"/>
    <add key="Web2" value="C:\Inetpub\wwwroot\SuperWeb2\server_status.config.xml"/>
</StatusFilePaths>
- Build the project.
- If you built the ServerMonitorService project,
navigate to the output folder and run install_service.bat to
install the service.
- If you built and installed the windows service, you can start Server
Monitoring Service in the Services list. If you built the console
server, run ConsoleServerMonitor.exe or simply start debugging from Visual
Studio.
- Note that the status files are created in the specified folders.
To configure your web application
- Open your web application in visual studio
- Add an App_Code ASP.NET folder to your application, if your application does not have one.
- Copy PartitionResolver.cs and ServerListSectionHandler.cs from SampleWeb\App_Code folder to your web application's App_Code folder.
- Open the project's web configuration file. (Add a new web configuration file if your application does not have one)
- Add a new SessionStateServers section element in the configSections collection as shown below:
<configSections>
	<section name="SessionStateServers" type="ServerListSectionHandler" restartOnExternalChanges="false"/>
</configSections>
- Configure the newly added SessionStateServers section to be read from an external
file as shown below:
<SessionStateServers configSource="server_status.config.xml"/>
(If the status file has a different filename, specify that instead)
- In the system.web element, configure the application to use the custom partition resolver as shown below:
<system.web>
    <sessionState mode="StateServer" partitionResolverType="PartitionResolver"/>
...
- Your web application is now set up to use the state server failover system
Points of Interest
I originally wanted the monitoring service to update a single status file, which
multiple web applications could share. That plan didn't work because ASP.NET only works with external configuration files that are located in the application folder
or in its subfolders. Because of this restriction, different web
applications can not share one external configuration file.
It's not necessary to set the restartOnExternalChanges attribute
of the section element in the web.config file to true. Setting
this attribute to true causes the web application to restart whenever the external
config file is updated, which will cause any data stored in the Application object to
be lost.
The web application will still read the latest data in the external config file,
if the attribute's value is set to false, without restarting the application.
The name of the root element of the status file is determined by the StatusXMLRootTag
setting of the monitoring service's configuration.
The name must match the name of the new section you add to your web application's
web.config file. The name must also be specified in the state server partition resolver
class (PartitionResolver.cs)